Ansible is an IT automation engine, and a trouble-free model-driven configuration management and command execution framework. Made for multi-tier deployments, it designs your IT infrastructure by describing how all of your systems are interrelated instead of just managing one system at a time. Written in Python, Ansible does not use any agent. It makes uses the SSH server on the target, and no additional custom security infrastructure is required, making it easy to deploy.
Ansible comes up with following uses:
1). Normal configuration management
Creates system files through the medium of templates
Manages software installation with the help of yum, apt, gem, or the like
Manages services or daemons such as start, stop, enable, disable
2). Orchestration tasks
Removing server from load balancers
Disabling monitoring or altering
Perform deployment of your code by git
3). Continuous integration
Ansible Architecture:
Modules
Modules are like small programs that Ansible pushes out from a control machine to all the nodes or remote hosts. The modules are executed using playbooks, and they control things such as services, packages, and files. Ansible executes all the modules for installing updates or whatever the required task is, and then removes them when finished. Ansible provides more than 450 modules for everyday tasks.
Plugins
As you probably already know from many other tools and platforms, plugins are extra pieces of code that augment functionality. Ansible comes with a number of its plugins, but you can write your own as well. Action, cache, and callback plugins are three examples.
Inventories
All the machines you’re using with Ansible (the control machine plus nodes) are listed in a single simple file, along with their IP addresses, databases, servers and so on. Once you register the inventory, you can assign variables to any of the hosts using a simple text file. You can also pull inventory from sources like EC2 (Amazon Elastic Compute Cloud).
Playbooks
Ansible playbooks are like instruction manuals for tasks. They are simple files written in YAML, which stands for YAML Ain’t Markup Language, a human-readable data serialization language. Playbooks are really at the heart of what makes Ansible so popular is because they describe the tasks to be done quickly and without the need for the user to know or remember any particular syntax. Not only can they declare configurations, but they can orchestrate the steps of any manually ordered task, and can execute tasks at the same time or at different times.
Each playbook is composed of one or multiple plays, and the goal of a play is to map a group of hosts to well-defined roles, represented by tasks.
APIs
Various APIs (application programming interfaces) are available so you can extend Ansible’s connection types (meaning more than just SSH for transport), callbacks and more.
Steps:
Step 1: Execute the following commands to update repositories, add the required repositories and configure PPA on your machine for Ansible installation:
$ sudo apt-get update
$ sudo apt-get install software-properties-common
$ sudo apt-add-repository ppa:ansible/ansible
Press enter to accept the PPA addition and then finally install Ansible after updating the repositories.
$ sudo apt-get update
$ sudo apt-get install ansible
Check Ansible version on master node:-
Step 2: Go to your server’s /etc/hosts file and add the hostname and the IP address of the host.
Add client’s hostname and IP address in /etc/hosts file ( on master node ):-
sudo gedit /etc/hosts
( NOTE: Replace x.x.x.x with master node’s local IP address & Replace y.y.y.y with client node’s local IP address )
Here, ansadm is the hostname of master node, and client1 is the hostname of the client node
Fig: Add Remote hosts to /etc/hosts File – Ansible Provisioning
Granting privileges for ansible admin user (ansadm) in /etc/sudoers file :-
( on both master and client nodes )
sudo gedit /etc/sudoers
Append the following at the end of the file
Step 3: As Ansible works on the agentless architecture of using SSH to communicate with its hosts, set-up the ssh keys. Basically, we have one server and one host. We control the host with our server and hence we create a public ssh-key on the server and copy it in the host’s machine. Execute the following command on the server:
$ ssh-keygen
You’ll be prompted to enter the filename where you’d like to save your key and also prompt you for creating a password for accessing the generated key which is optional. By default, the public key gets saved in .ssh/id_rsa.pub file and the private key gets saved in .ssh/id_rsa.
Now this generated key needs to be present in your host. Copying the key into the host can be done in two ways, either manually copy into the host or use the ssh-copy-id command. In this case, I’m going to copy it using the ssh-copy-id root@IP_of_host command.
$ ssh-copy-id root@x.x.x.x
Note- Make sure you’re able to ssh into your host before executing this command.
Step 4: Configure Ansible hosts. Go to /etc/ansible/hosts file and add the hostname. This will vary according to the number of hosts and servers you have. You can also have more than one server here.
Append client’s hostname and IP address at the end of /etc/ansible/hosts file ( on master node )
sudo gedit /etc/ansible/hosts
( NOTE: Replace the above IP address with client node’s local IP address )
In this case, client’s IP address is 10.101.1.143
Step: 5 Create git.yml file inside /etc/ansible directory ( on master node )
Type the following in git.yml playbook file:-
Switch to ansible admin (ansadm) user on master node
Checking connectivity with client1 :-
Run the command “git” on client node :-
This means git is currently not installed on client1
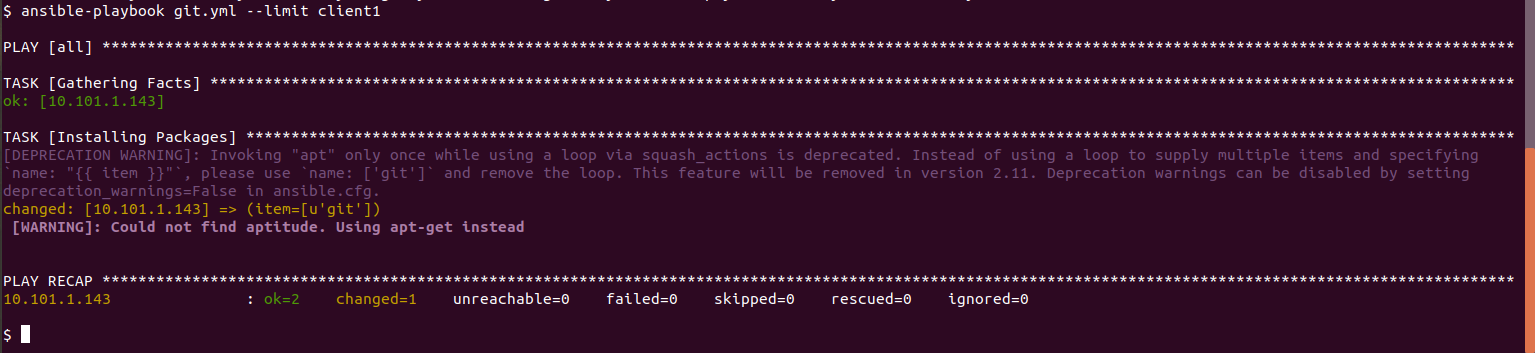
On master node, go to the directory in which git.yml playbook file is present:-

Run the following command on master node :-
ansible-playbook git.yml --limit client1
Run the command “git” on client node :-
(Remote installation of git has been successfully done on client1 using Ansible)